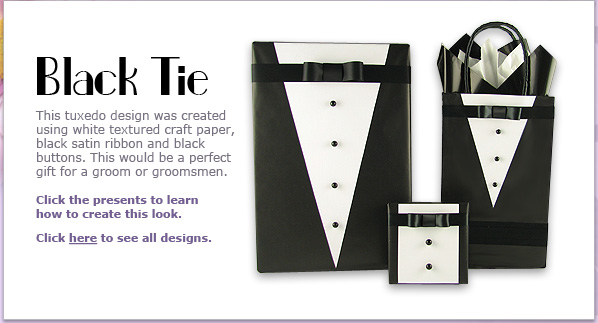
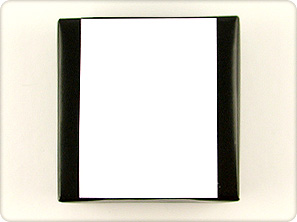
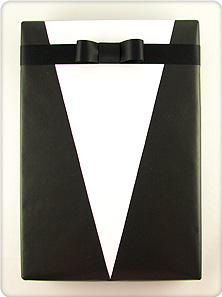
Small Box

Difficulty - Easy
Materials
- Black wrapping paper
- White linen textured craft or scrapbooking paper (medium weight)
- 3/4-inch wide black satin ribbon
- 2 round black buttons
Instructions
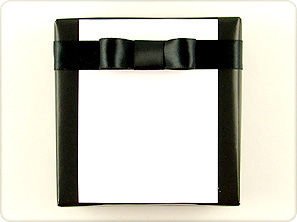
- Wrap a box in black wrapping paper.
- Cut a piece of the white craft paper 1-inch smaller than the width of the top of the box and the length measurement of the top of the box.
- Apply glue stick to the wrong side of the craft paper, especially around the edges. Attach the craft paper to the box, centering the paper evenly on the top of the box.
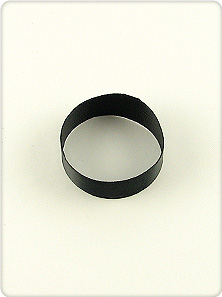
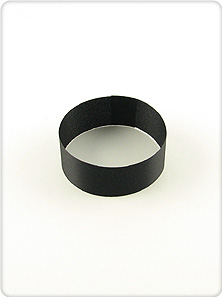
- Cut a piece of the black satin ribbon long enough to wrap around the entire width of the box plus 1 inch. Wrap the piece of ribbon around the box, ½ inch from the top and glue the overlapping ends on the bottom of the box.
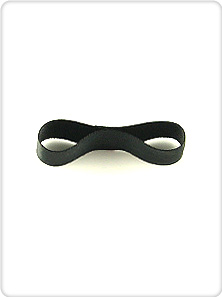
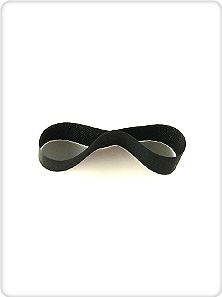
- To make the bow, cut a 7-inch piece of ribbon. Fold the ends to middle, overlapping about 1/4 inch, and glue to form a loop.
Note: Ribbon measurements for bows are approximate. The lengths may have to be adjusted slightly based on the size of the box used.
- Apply glue to the inside center to create two loops.
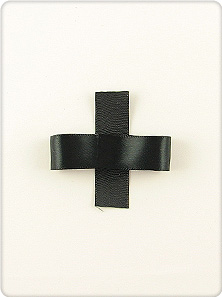
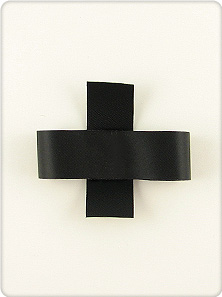
- Cut a 2-1/2 inch piece of ribbon and place the right side of the double loop bow face down onto the inside of the 2-1/2 inch piece of ribbon.
- Apply glue to each end of the 2-1/2 inch strip and fold over to form a bow.
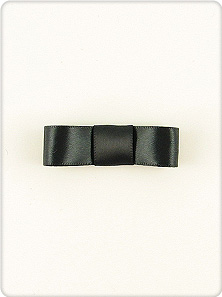
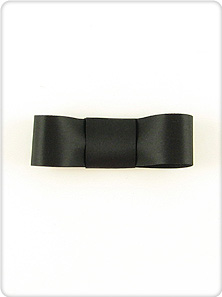
- Glue the bow onto the center of the black satin ribbon.
- Glue the 2 black buttons, evenly spaced, on middle of the box directly centered under the bow to complete the design.
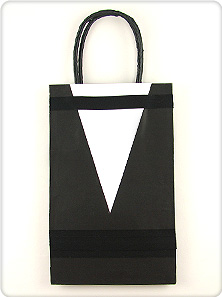
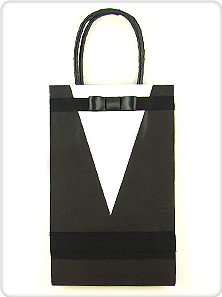
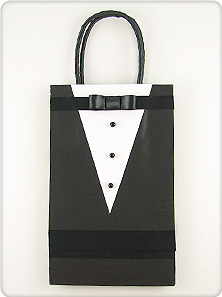
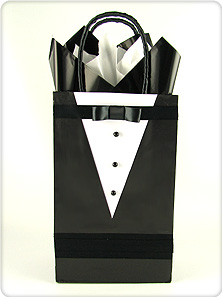
Gift Bag
Difficulty - Medium
Materials
- Medium black gift bag with stiff handles (plain gift bags are inexpensive and easy to find at your local craft or party store)
- White linen textured craft or scrapbooking paper (medium weight)
- 3/4-inch wide black satin ribbon
- 3 small round black buttons
- Decorative black and white tissue paper
Instructions
- Cut a piece of the white craft paper 2/3 of the length and the 2 inches smaller than width of the front of the gift bag.
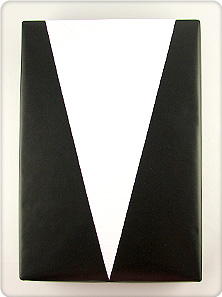
- On the wrong side of the craft paper, mark the center of one of the short edges and draw a line from each of the corners on the opposite short end to the center mark to form a triangle. Cut along the lines.
- Apply glue to the wrong side of the craft paper especially around the edges. Attach the paper to the front of the gift bag, lining up the edges of the paper with the top edge of the bag.
- To cover the handles, apply a small amount of glue to a few inches of the back of the ribbon and wrap the ribbon around the handle where it meets with the inside of the bag.
- Continue to add glue to the ribbon, a few inches at a time, as you continue to wrap the ribbon around the handle, slightly overlapping the ribbon.
- Finish by cutting the ribbon and tucking the end behind the handle where it meets with the inside of the bag. Repeat this process with the other handle.
- Cut 3 pieces of the black satin ribbon the entire width of the front of the gift bag.
- Glue 2 pieces of ribbon, with the sides touching, to the front of the gift bag so they are centered between the bottom point of the craft paper triangle and the bottom of the bag. Small amounts of glue can be added to the cut edges of each side of the ribbon to prevent fraying.
- Glue the last piece of ribbon centered on top of the 2 pieces of ribbon to form the layered cummerbund.
- Cut 1 piece of the black satin ribbon the entire width of the front of the gift bag. Glue the ribbon to the front of the gift bag 1 inch from the top. Small amounts of glue can be added to the cut edges of each side of the ribbon to prevent fraying.
- To make the bow, cut a 7-inch piece of ribbon. Fold the ends to middle, overlapping about 1/4 inch, and glue to form a loop.
Note: Ribbon measurements for bows are approximate. The lengths may have to be adjusted slightly based on the size of the box used.
- Apply glue to the inside center to create two loops.
- Cut a 2-1/2 inch piece of ribbon and place the right side of the double loop bow face down onto the inside of the 2-1/2 inch piece of ribbon.
- Apply glue to each end of the 2-1/2 inch strip and fold over to form a bow.
- Glue the bow onto the center of the black satin ribbon on the top of the bag.
- Glue the 3 black buttons, evenly spaced, on middle of the bag directly centered under the bow.
- Fill the bag with layered tissue paper to finish the bag.
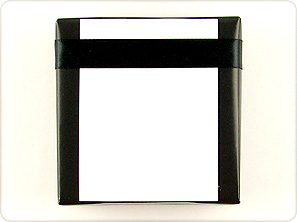
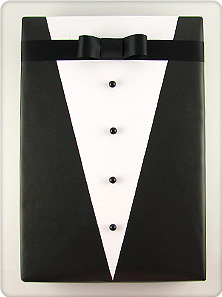
Large Box
Difficulty - Easy
Materials
- Black wrapping paper
- White linen textured craft or scrapbooking paper (medium weight)
- 1-inch wide black satin ribbon
- 4 small round black buttons
Instructions
- Wrap a box in black wrapping paper.
- Cut a piece of the white craft paper 2 inches smaller than the width of the top of the box and the length measurement of the top of the box.
- On the wrong side of the craft paper, mark the center of one of the short edges and draw a line from each of the corners on the opposite short end to the center mark to form a triangle. Cut along the lines.
- Apply glue stick to the wrong side of the craft paper, especially around the edges. Attach the craft paper to the box, centering the paper evenly on the top of the box.
- Cut a piece of the black satin ribbon long enough to wrap around the entire width of the box plus 1 inch. Wrap the piece of ribbon around the box, 1 inch from the top and glue the overlapping ends on the bottom of the box.
- To make the bow, cut a 7-inch piece of ribbon. Fold the ends to middle, overlapping about 1/4 inch, and glue to form a loop.
Note: Ribbon measurements for bows are approximate. The lengths may have to be adjusted slightly based on the size of the box used.
- Apply glue to the inside center to create two loops.
- Cut a 2-1/2 inch piece of ribbon and place the right side of the double loop bow face down onto the inside of the 2-1/2 inch piece of ribbon.
- Apply glue to each end of the 2-1/2 inch strip and fold over to form a bow.
- Glue the bow onto the center of the black satin ribbon.
- Glue the 4 black buttons, evenly spaced, on middle of the box directly centered under the bow to complete the design.
|