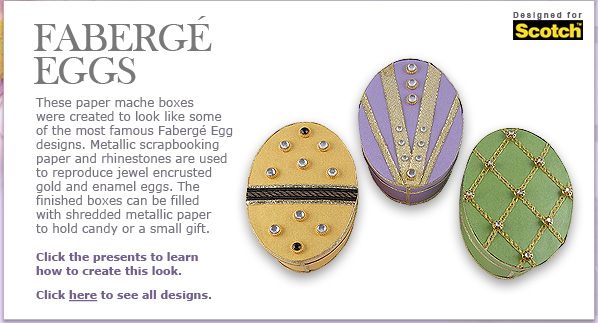
Gold Box
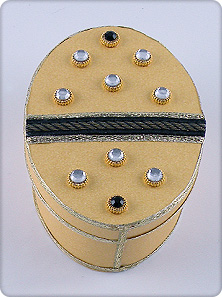
Difficulty - Hard
Materials
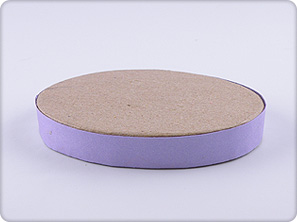
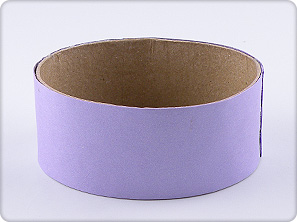
- 3 inch oval paper mache box (paper mache boxes can be found at your local craft store)
- Gold metallic scrapbooking or craft paper
- 1/2 inch wide black and gold patterned ribbon
- 1/8 inch wide gold ribbon
- 10 flat gold beads
- 8 clear rhinestones
- 2 black rhinestones
- Scotch™ Precision Scissors (for cutting paper and ribbon)
- Scotch® Permanent Glue Stick (for attaching scrapbooking paper)
- Scotch® Clear Glue with 2-Way Applicator (for gluing ribbon)
- Scotch® Quick Drying Tacky Glue (for gluing the rhinestones and beads)
Instructions
- Using Scotch™ Precision Scissors cut a piece of the gold metallic craft paper measuring the entire length plus 1/4 inch and the exact height of the side of the oval box lid. Cut another piece of the gold metallic craft paper the entire length plus 1/4 inch and the exact height of the bottom side of the oval box.
- Using the Scotch® Permanent Glue Stick, apply glue to the wrong side of the craft paper, especially around the edges. Attach the paper to the side of the box, lining up the top and bottom edge of the paper with the edges of the box and overlapping the edges on narrow part of the oval. Repeat this process with the bottom part of the box.
- Use the lid of the box to trace the oval shape onto the wrong side of the gold craft paper. Cut out the shape using Scotch™ Precision Scissors. Trace the oval shape of the bottom part of the box onto the wrong side of the gold craft paper and cut out.
- Using the Scotch® Permanent Glue Stick, apply glue to the wrong side of the craft paper oval traced from the lid. Attach the paper to the top of the box, lining up all of the edges. Repeat with the bottom part of the box.
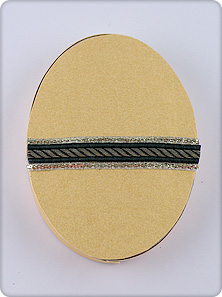
- Cut one piece of the black ribbon and two pieces of the gold ribbon the entire width of the center top of the oval box lid.
- Using the precision tip of Scotch® Clear Glue, attach the piece of the black ribbon centered on the top of the oval box lid and glue the two pieces of gold ribbon on the top and bottom edge of the black ribbon. Small amounts of glue can be added to the cut edges of each side of the ribbon to prevent fraying.
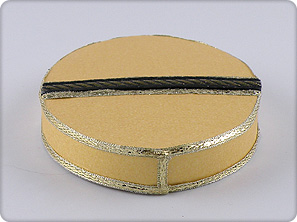
- Cut two pieces of the gold ribbon long enough to wrap around the sides of the box lid.
- Using Scotch® Quick Drying Tacky Glue, apply glue to the gold ribbon and attach it to the top and bottom sides of the box starting where the craft paper overlaps on the end of the box.
- Cut a piece of gold ribbon the height of the box lid. Glue the ribbon over the seam where the craft paper and ribbon ends meet to make the seam invisible.
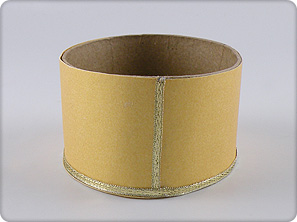
- Cut one piece of the gold ribbon long enough to wrap around the sides of the bottom part of the box.
- Using Scotch® Quick Drying Tacky Glue, apply glue to the gold ribbon and attach it to the bottom edge of the box starting where the craft paper overlaps on the end of the box.
- Cut a piece of gold ribbon the height of the bottom of the box. Glue the ribbon over the seam where the craft paper and ribbon ends meet to make the seam invisible.
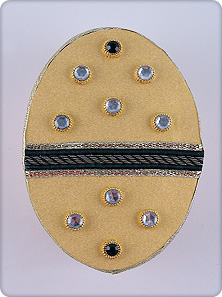
- Using Scotch® Quick Drying Tacky Glue, attach one clear rhinestone on top of the hole of each of the gold beads. Repeat with the two black rhinestones. Let dry.
- Using Scotch® Quick Drying Tacky Glue, attach the rhinestones to the top of the box lid in the configuration shown in the picture below.
Purple Box
Difficulty - Hard
Materials
- 3 inch oval paper mache box (paper mache boxes can be found at your local craft store)
- Purple metallic scrapbooking or craft paper
- 1/2 inch wide gold ribbon
- 1/4 inch wide gold ribbon
- 1/8 inch wide gold ribbon
- 4 flat gold beads
- 4 clear rhinestones
- 6 small clear rhinestones
- Scotch™ Precision Scissors (for cutting paper and ribbon)
- Scotch® Permanent Glue Stick (for attaching scrapbooking paper)
- Scotch® Clear Glue with 2-Way Applicator (for gluing ribbon)
- Scotch® Quick Drying Tacky Glue (for gluing the rhinestones and beads)
Instructions
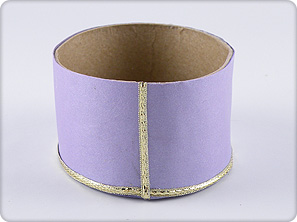
- Using Scotch™ Precision Scissors cut a piece of the purple metallic craft paper measuring the entire length plus 1/4 inch and the exact height of the side of the oval box lid. Cut another piece of the purple metallic craft paper the entire length plus 1/4 inch and the exact height of the bottom side of the oval box.
- Using the Scotch® Permanent Glue Stick, apply glue to the wrong side of the craft paper, especially around the edges. Attach the paper to the side of the box, lining up the top and bottom edge of the paper with the edges of the box and overlapping the edges on narrow part of the oval. Repeat this process with the bottom part of the box.
- Use the lid of the box to trace the oval shape onto the wrong side of the gold craft paper. Cut out the shape using Scotch™ Precision Scissors. Trace the oval shape of the bottom part of the box onto the wrong side of the gold craft paper and cut out.
- Using the Scotch® Permanent Glue Stick, apply glue to the wrong side of the craft paper oval traced from the lid. Attach the paper to the top of the box lining up all of the edges. Repeat with the bottom part of the box.
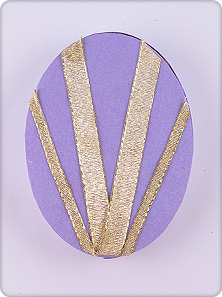
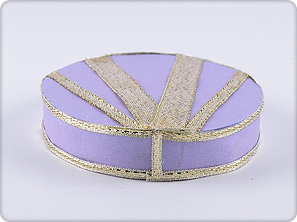
- Cut two pieces of the 1/2 inch wide and two pieces of the 1/4 inch wide gold ribbon the entire length of the top of the oval box lid.
- Using the precision tip of Scotch® Clear Glue, attach the two pieces of the 1/2 inch gold ribbon centered on the top of the oval box lid at a slight angle and glue the two pieces of 1/4 inch gold ribbon on each side of the ½ inch wide ribbon as shown in the picture below. Trim any excess ribbon so the ends meet the sides of the box lid. Small amounts of glue can be added to the cut edges of each side of the ribbon to prevent fraying.
- Cut two pieces of the gold ribbon long enough to wrap around the sides of the box lid.
- Using Scotch® Quick Drying Tacky Glue, apply glue to the gold ribbon and attach it to the top and bottom sides of the box starting where the craft paper overlaps on the end of the box.
- Cut a piece of gold ribbon the height of the box lid. Glue the ribbon over the seam where the craft paper and ribbon ends meet to make the seam invisible.
- Cut one piece of the gold ribbon long enough to wrap around the sides of the box bottom.
- Using Scotch® Quick Drying Tacky Glue, apply glue to the gold ribbon and attach it to the bottom side of the box starting where the craft paper overlaps on the end of the box.
- Cut a piece of gold ribbon the height of the box bottom. Glue the ribbon over the seam where the craft paper and ribbon ends meet to make the seam invisible.
- Using Scotch® Quick Drying Tacky Glue, attach one clear rhinestone on top of the hole of each of the gold beads. Let dry.
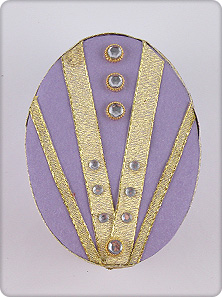
- Using Scotch® Quick Drying Tacky Glue, attach the rhinestones to the top of the box lid in the configuration shown in the picture below.
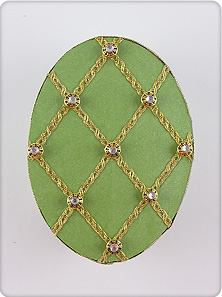
Green Box
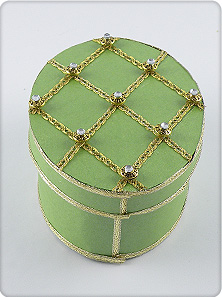
Difficulty - Hard
Materials
- 3 inch oval paper mache box (paper mache boxes can be found at your local craft store)
- Green metallic scrapbooking or craft paper
- 1/8 inch wide gold chain ribbon
- 9 gold textured beads
- 9 small clear rhinestones
- Scotch™ Precision Scissors (for cutting paper and ribbon)
- Scotch® Permanent Glue Stick (for attaching scrapbooking paper)
- Scotch® Clear Glue with 2-Way Applicator (for gluing ribbon)
- Scotch® Quick Drying Tacky Glue (for gluing the rhinestones)
Instructions
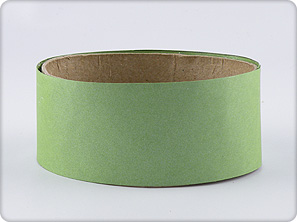
- Using Scotch™ Precision Scissors cut a piece of the gold metallic craft paper measuring the entire length plus 1/4 inch and the exact height of the side of the oval box lid. Cut another piece of the gold metallic craft paper the entire length plus 1/4 inch and the exact height of the bottom side of the oval box.
- Using the Scotch® Permanent Glue Stick, apply glue to the wrong side of the craft paper, especially around the edges. Attach the paper to the side of the box, lining up the top and bottom edge of the paper with the edges of the box and overlapping the edges on narrow part of the oval. Repeat this process with the bottom part of the box.
- Use the lid of the box to trace the oval shape onto the wrong side of the gold craft paper. Cut out the shape using Scotch™ Precision Scissors. Trace the oval shape of the bottom part of the box onto the wrong side of the gold craft paper and cut out.
- Using the Scotch® Permanent Glue Stick, apply glue to the wrong side of the craft paper oval traced from the lid. Attach the paper to the top of the box lining up all of the edges. Repeat with the bottom part of the box.
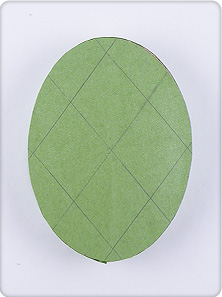
- Lightly draw diagonal lines centered on the top of the box lid as shown in the picture below. These will be used as a gluing guide for the ribbon.
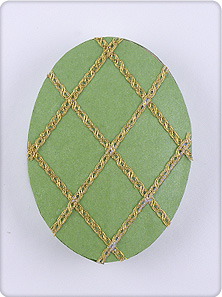
- Cut six pieces of the gold chain ribbon the length of each one of the diagonal lines. Using the precision tip of Scotch® Clear Glue, attach each piece of ribbon to the top of the box lid over the diagonal guides. Trim any excess ribbon so the ends meet the sides of the box lid. Small amounts of glue can be added to the cut edges of each side of the ribbon to prevent fraying.
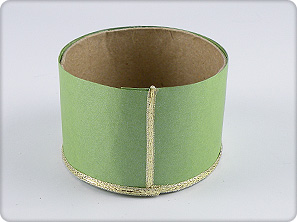
- Cut two pieces of the gold ribbon long enough to wrap around the sides of the box lid.
- Using Scotch® Quick Drying Tacky Glue, apply glue to the gold ribbon and attach it to the top and bottom sides of the box starting where the craft paper overlaps on the end of the box.
- Cut a piece of gold ribbon the height of the box lid. Glue the ribbon over the seam where the craft paper and ribbon ends meet to make the seam invisible.
- Cut one piece of the gold ribbon long enough to wrap around the sides of the box bottom.
- Using Scotch® Quick Drying Tacky Glue, apply glue to the gold ribbon and attach it to the bottom side of the box starting where the craft paper overlaps on the end of the box.
- Cut a piece of gold ribbon the height of the box bottom. Glue the ribbon over the seam where the craft paper and ribbon ends meet to make the seam invisible.
- Using Scotch® Quick Drying Tacky Glue, attach one clear rhinestone on top of the hole of each of the gold beads. Let dry.
- Using Scotch® Quick Drying Tacky Glue, attach the rhinestones to the top of the box lid at each intersecting point of the ribbon as shown in the picture below.
|