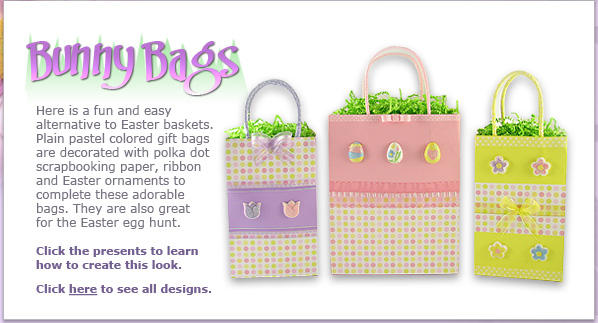
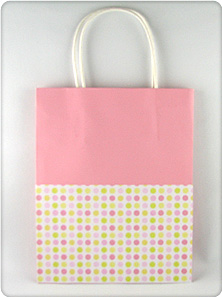
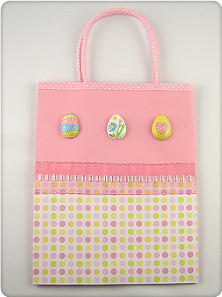
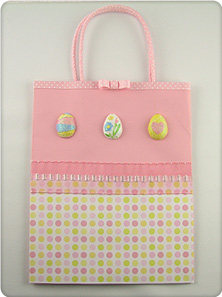
Medium Pink Gift Bag
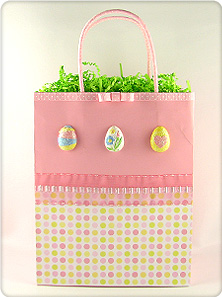
Difficulty - Easy
Materials
- Medium pink gift bag with stiff handles (plain gift bags are inexpensive
and easy to find at your local craft or party store)
- Pastel polka dot scrapbooking or craft paper
- 3 Easter egg ornaments (strings removed)
- 1-1/2 inch wide pink sheer decorative ribbon
- 3/8 inch wide pink and white polka dot ribbon
- Decorative green shredded paper
Instructions
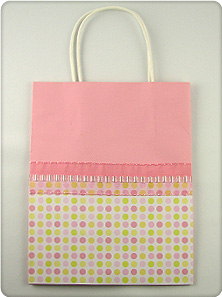
- Cut a piece of the polka dot craft paper half the length and the entire width of the front of the gift bag.
- Apply craft glue to the inside of the craft paper and attach it to the front of the gift bag, lining up the edges of the craft paper with the bottom edge of the bag.
- Cut a piece of the decorative pink sheer ribbon the entire width of the front of the gift bag.
- Glue the ribbon to the front of the gift bag so it is centered over the edge of the craft paper.
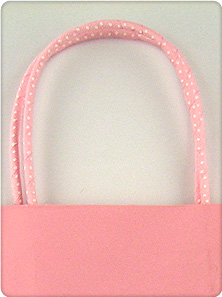
- To cover the handles, apply a small amount of glue to a few inches on the back of the polka dot ribbon and wrap the ribbon around the handle where it meets with the inside of the bag.
- Continue to add glue to the ribbon, a few inches at a time, as you continue to wrap the ribbon around the handle, slightly overlapping the ribbon as you go.
- Finish by cutting the ribbon and tucking the end behind the handle where it meets with the inside of the bag. Repeat this process with the other handle.
- Cut a piece of the pink polka dot ribbon the entire width of the front of the gift bag.
- Glue the ribbon to the front of the gift bag so it is lined up with the top edge of the bag.
- Apply glue to the back of each of the egg ornaments and apply them to the front of the gift bag, centering them on the pink section of the bag.
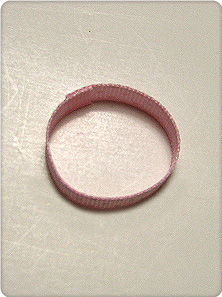
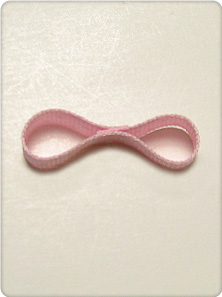
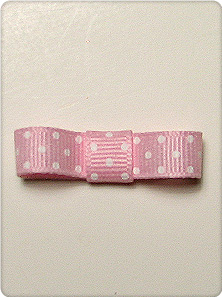
- To make the bow, cut a 4 inch piece of polka dot ribbon. Fold the ends to middle, overlapping about 1/4 inch, and glue to form a loop.
- Apply glue to the inside center to create two loops.
- Cut a 1-1/2 inch piece of ribbon and place the right side of the double loop bow face down onto the inside of the 1-1/2 inch piece of ribbon.
- Apply glue to each end of the 1-1/2 inch strip and fold over to form a bow.
- Glue the bow onto the center of the pink polka dot ribbon.
- Fill the bag with green shredded paper to finish your Easter bag.
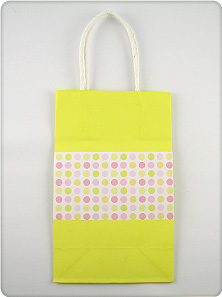
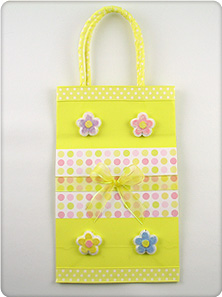
Small Yellow Gift Bag
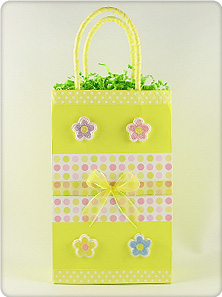
Difficulty - Easy
Materials
- Small yellow gift bag with stiff handles (plain gift bags are inexpensive
and easy to find at your local craft or party store)
- Pastel polka dot scrapbooking or craft paper
- 4 flower Easter ornaments (strings removed)
- 5/8 inch wide yellow sheer decorative ribbon
- 5/8 inch wide yellow and white polka dot ribbon
- Decorative green shredded paper
Instructions
- Cut a piece of the polka dot craft paper 1/3 the length and the entire width of the front of the gift bag.
- Apply craft glue to the inside of the craft paper and attach it to the front of the gift bag, centering the paper evenly on the top of the bag.
- To cover the handles, apply a small amount of glue to a few inches on the back of the polka dot ribbon and wrap the ribbon around the handle where it meets with the inside of the bag.
- Continue to add glue to the ribbon, a few inches at a time, as you continue to wrap the ribbon around the handle, slightly overlapping the ribbon as you go.
- Finish by cutting the ribbon and tucking the end behind the handle where it meets with the inside of the bag. Repeat this process with the other handle.
- Cut a 2 pieces of the yellow polka dot ribbon the entire width of the front of the gift bag.
- Glue the ribbon to the front of the gift bag, lining one piece with the top edge of the bag and the other with the bottom edge of the bag.
- Cut a piece of the decorative yellow sheer ribbon the entire width of the front of the gift bag.
- Glue the sheer ribbon to the front of the gift bag so it is centered on the craft paper.
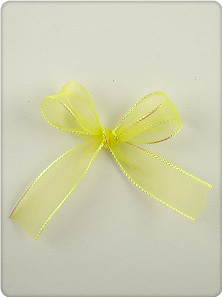
- To make the bow, cut a 14 inch piece of decorative sheer yellow ribbon. Form two evenly sized loops with the ends being the same length.
- Tie the two loops together to form a bow. Adjust the loops so they are even with each other.
- Glue the bow onto the center of the sheer yellow ribbon.
- Trim the tails of the bow to matching lengths, cutting them at an angle.
- Apply glue to the back of each of the flower ornaments and apply them to the front of the gift bag, centering 2 onto each yellow section of the bag.
- Fill the bag with green shredded paper to finish your Easter bag.
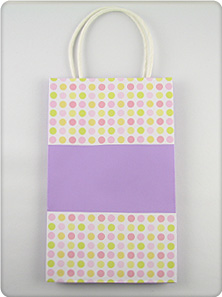
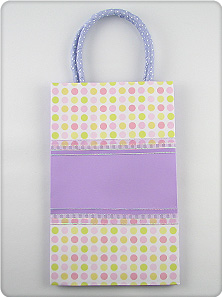
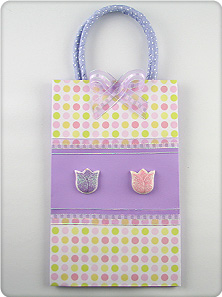
Small Purple Gift Bag
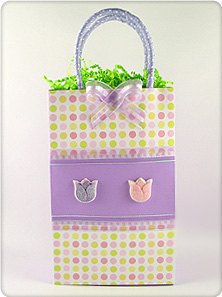
Difficulty - Easy
Materials
- Small purple gift bag with stiff handles (plain gift bags are inexpensive
and easy to find at your local craft or party store)
- Pastel polka dot scrapbooking or craft paper
- 2 flower Easter ornaments (strings removed)
- 5/8 inch wide purple sheer decorative ribbon
- 5/8 inch wide purple and white polka dot ribbon
- Decorative green shredded paper
Instructions
- Cut 2 pieces of the polka dot craft paper, each piece 1/3 the length and the entire width of the front of the gift bag.
- Apply craft glue to the inside of the craft paper and attach one piece to the front of the gift bag, lining the edge of the paper with the bottom edge of the bag and the other with the top edge of the bag.
- To cover the handles, apply a small amount of glue to a few inches on the back of the polka dot ribbon and wrap the ribbon around the handle where it meets with the inside of the bag.
- Continue to add glue to the ribbon, a few inches at a time, as you continue to wrap the ribbon around the handle, slightly overlapping the ribbon as you go. Finish by cutting the ribbon and tucking the end behind the handle where it meets with the inside of the bag. Repeat this process with the other handle.
- Cut 2 pieces of the decorative purple sheer ribbon the entire width of the front of the gift bag.
- Glue the ribbon to the front of the gift bag so one piece is centered over the top edge of the craft paper and the other is centered over the bottom edge of the craft paper.
- To make the bow, cut a 14 inch piece of decorative sheer purple ribbon.
- Form two loops by folding each end down over the middle of the ribbon, crossing each other and glue in the center. Allow a few inches of the ribbon to extend as tails.
- Glue the bow onto the top center gift bag, between the two handles.
- Trim the tails of the bow to matching lengths, cutting them at an angle.
- Apply glue to the back of each of the flower ornaments and apply them to the front of the gift bag, centering them onto the purple section of the bag.
- Fill the bag with green shredded paper to finish your Easter bag.
|