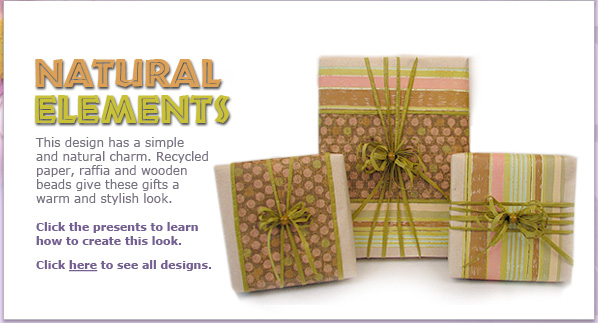
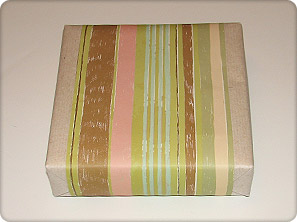
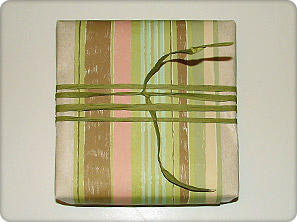
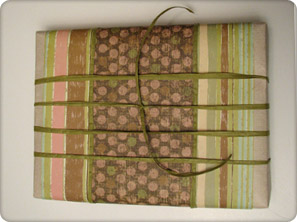
Small Box - Stripes

Difficulty - Easy
Materials
- Oatmeal colored recycled wrapping paper
- Striped rustic craft or scrapbooking paper
- Pale green raffia (Raffia is very easy to use. It is very pliable
which allows for fun multi-looped bows with little effort.)
- 1 Round wooden bead
Instructions
- Wrap a box in oatmeal colored paper.
- Cut a piece of the striped craft paper 2 inches smaller than the
width of the box and the length to wrap around the entire box plus
1 inch.
- If the craft paper is not long enough to wrap around the entire
box, tape two pieces together on the wrong side of the paper, matching
the pattern, to achieve the desired length.
- Using double-sided tape, tape the inside of the craft paper in even
intervals at the edges. Apply to the box, centering the paper evenly
on the top of the box and overlapping the ends on the bottom of the
box.
- Wrap the raffia 4 times continuously around the box and tie ends
together on one the middle strings, leaving a few inches for tails.
Don't worry if the raffia crosses on the bottom of the box.
- To make the bow, hold the ribbon about 3 inches from the end with
your thumb and form about a 2 inch loop in length. Securing the loop
with your thumb, form another loop below the first loop, securing
with your thumb. Continue this motion, holding each new loop with
your thumb, until you have 6 loops on each side.
- Feed the middle ribbon tail under the other middle ribbon and tie
the bow to the package with a double knot, using these tails. Closely
trim the ends of the knot.
- Separate the loops from each other, fluff the bow and trim the tails
to the desired length.
- Glue a wooden bead onto the middle of the bow.
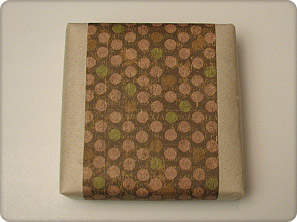
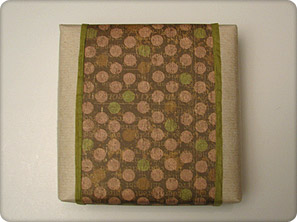
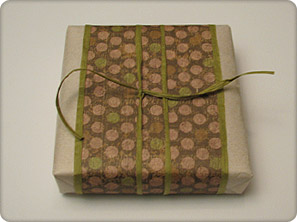
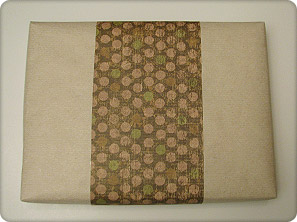
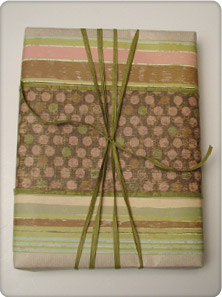
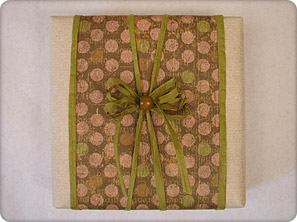
Small Box - Polka Dots
Difficulty - Easy
Materials
- Oatmeal colored recycled wrapping paper
- Striped rustic craft paper
- Pale green raffia
- 1 Round wooden bead
Instructions
- Wrap a box in cream paper
- Cut a piece of the polka dot craft paper 2 inches smaller than the
width of the box and the length to wrap around the entire box plus
1 inch.
- If the craft paper is not long enough to wrap around the entire
box, tape two pieces together on the wrong side of the paper, matching
the pattern, to achieve the desired length.
- Using double-sided tape, tape the inside of the craft paper in even
intervals at the edges. Apply to the box, centering the paper evenly
on the top of the box and overlapping the ends on the bottom of the
box.
- Cut two lengths of raffia long enough to wrap around the entire
box plus 1 inch. Glue raffia onto the edges of the craft paper, overlapping
the ends on the bottom of the box.
- Wrap the raffia 2 times continuously around the box, crisscrossing
on the bottom of the box. Tie ends on the top side of the box, leaving
a few inches for tails.
- To make the bow, hold the ribbon about 3 inches from the end with
your thumb and form a loop. Securing the loop with your thumb, form
another loop below the first loop, securing with your thumb. Continue
this motion, holding each new loop with your thumb, until you have
4 loops on each side.
- Tie the bow to the package using the ribbon tails, feeding the tail
under the other ribbon to cinch the two ribbons together. Closely
trim the ends of the knot.
- Separate the loops from each other, fluff the bow and trim the
tails to the desired length.
- Glue a wooden bead onto the middle of the bow.
Tip - Appling a small amount of glue under each strand
of ribbon at each end of the box will prevent the ribbon from slipping
out of place.
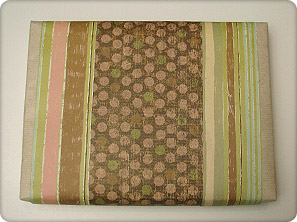
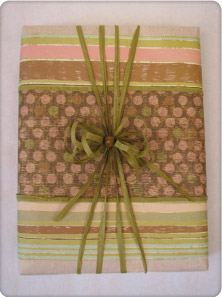
Large Box
Difficulty - Medium
Materials
- Oatmeal colored recycled wrapping paper
- Striped rustic craft paper
- Polka dot rustic craft paper
- Pale green raffia
- 1 Round wooden bead
Instructions
- Wrap a box in cream paper.
- Measure the width of the box minus 1". Divide the number by
2. One measurement will be for the polka dots and the other for the
stripes. For example My box is 11" wide. I am going to cut a
5 inch wide strip of polka dots and a 5 inch strip for the stripes.
Because I have the stripes on either side of the polka dots, the stripes
should then be cut into half to make 2 2-1/2 inch strips.
- Make sure it each strip is long enough to wrap around the entire
box plus 1 inch so you will have length to overlap.
- If the craft paper is not long enough to wrap around the entire
box, tape two pieces together on the wrong side of the paper, matching
the pattern, to achieve the desired length.
- Using double-sided tape, tape the inside of the craft paper in even
intervals at the edges. Apply the striped paper on each side of the
polka dots on the top of the box, not allowing any space between the
patterns and overlapping the ends on the bottom of the box.
- Cut two lengths of raffia long enough to wrap around the entire
box plus 1". Glue raffia onto the edges of the craft paper, covering
the seams of where the two papers meet, overlapping the ends on the
bottom of the box.
- Wrap the raffia 4 times continuously around the box and tie on one
the middle strings, leaving a few inches for tails. Don't worry if
ribbon crosses on the bottom of the box.
- Feed each tail under all ribbons and tie a knot to cinch the ribbons
together.
- To make the bow, hold the ribbon about 3 inches from the end with
your thumb and form a loop. Securing the loop with your thumb, form
another loop below the first loop, securing with your thumb. Continue
this motion, holding each new loop with your thumb, until you have
8 loops on each side.
- Tie the bow to the package using the ribbon tails on the package
then closely trim the ends of the knot.
- Separate the loops from each other, fluff the bow and trim the tails
to match each other.
- Glue a wooden bead onto the middle of the bow.
Tip - Appling a small amount of glue under each strand
of ribbon at each end of the box will prevent the ribbon from slipping
out of place.
|